Sunday, July 31, 2011

Girl Scouts Rule!
Homemade Tagalong Cookies

People seem to be into the "Passionate Presley" Cupcakes I made a while back, I've decided to revisit the Peanut Butter and Chocolate combination that most people are just in love with.
 
My favorite food blogger of all time goes by the handle of Cakespy - her website can be found here. Her actual name is Jessie Oleson and is based out of Seattle, Washington. She is truly fantastic and I have had the pleasure of communicating with her via e-mail and Twitter. Jessie is coming out with a cookbook of her own in early October. I'm proud to say that I pre-ordered it on Amazon pretty much the day that she announced the book was coming out (my pre-order date was April 1st). You can certainly do the same and pre-order the book at this link. I can vouch for the fact that this cookbook will be nothing short of amazing! 
 
Jessie aka Cakespy for the website Serious Eats (another fav food blog of mine) will sometimes come up with wild and crazy recipes. In February, she developed a homemade version of my husbands most beloved Girl Scout Cookie - the Tagalong! I've been waiting for an excuse to make them and Saturday was the day the process began! You can find the recipe at this link.

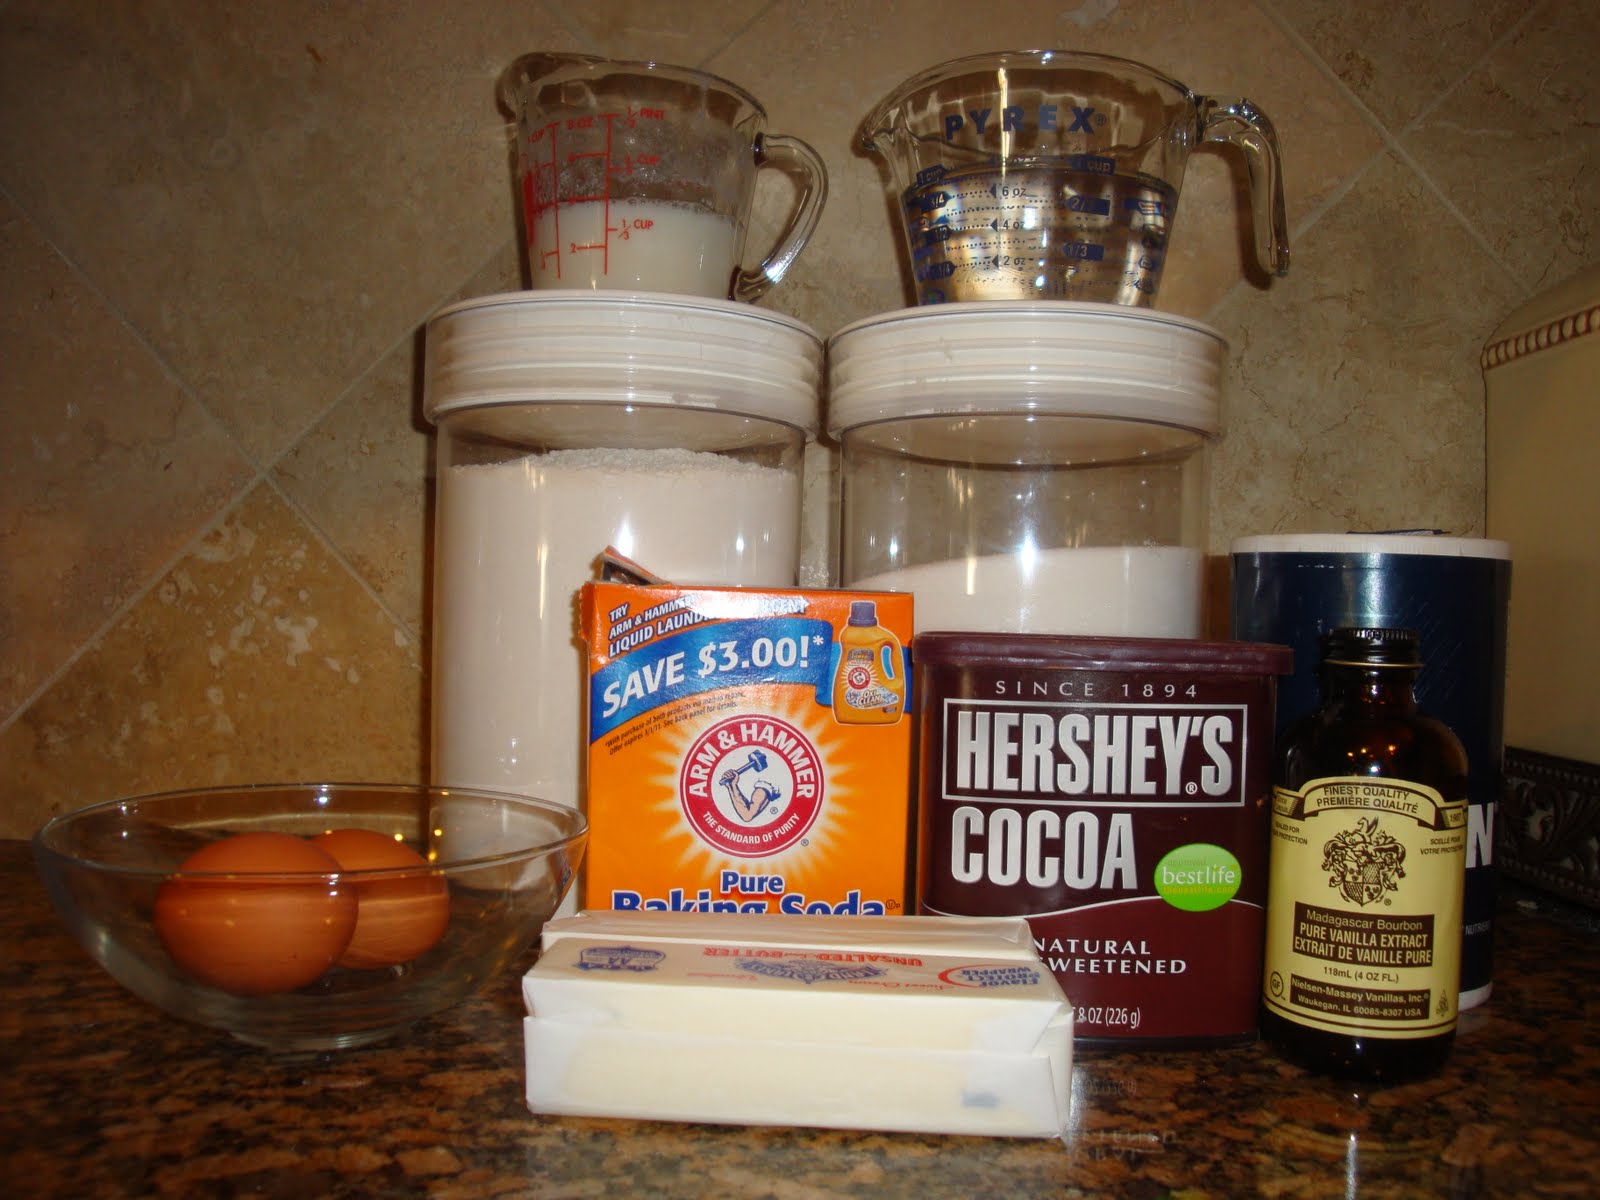
I was surprised that the recipe for the cookies did not include eggs or any sort of chemical riser such as baking powder or baking soda. The ingredients are displayed below. * Note: For those who are Gluten Free, I'd imagine that you could substitute the flour in this recipe for a gluten free flour and it would work just the same. I don't do much in the Gluten Free World though so I can't be certain on that advice. 
The dough, once composed must hang out in the refrigerator for 2-3 hours to firm up. In my case, it was overnight. Here is a photograph of the dough, it's really just a lump. 
The dough shaped in the oven about to start baking.
The finished cookies cooling on a rack - I used the back of a teaspoon (measuring spoon) to make the well in the middle of the cookies for the peanut butter mixture. I waited about 2-3 minutes after they came out of the oven to make the well.  
The peanut butter mixture is perfect and very similar to what the peanut butter mixture in the Girl Scout Cookies tastes like. The ingredients and then the completed mixture are pictured below.

The cookies with the peanut butter mixture on top.
I used Guittard Milk Chocolate chips and melted them in the microwave on 30 second intervals. 
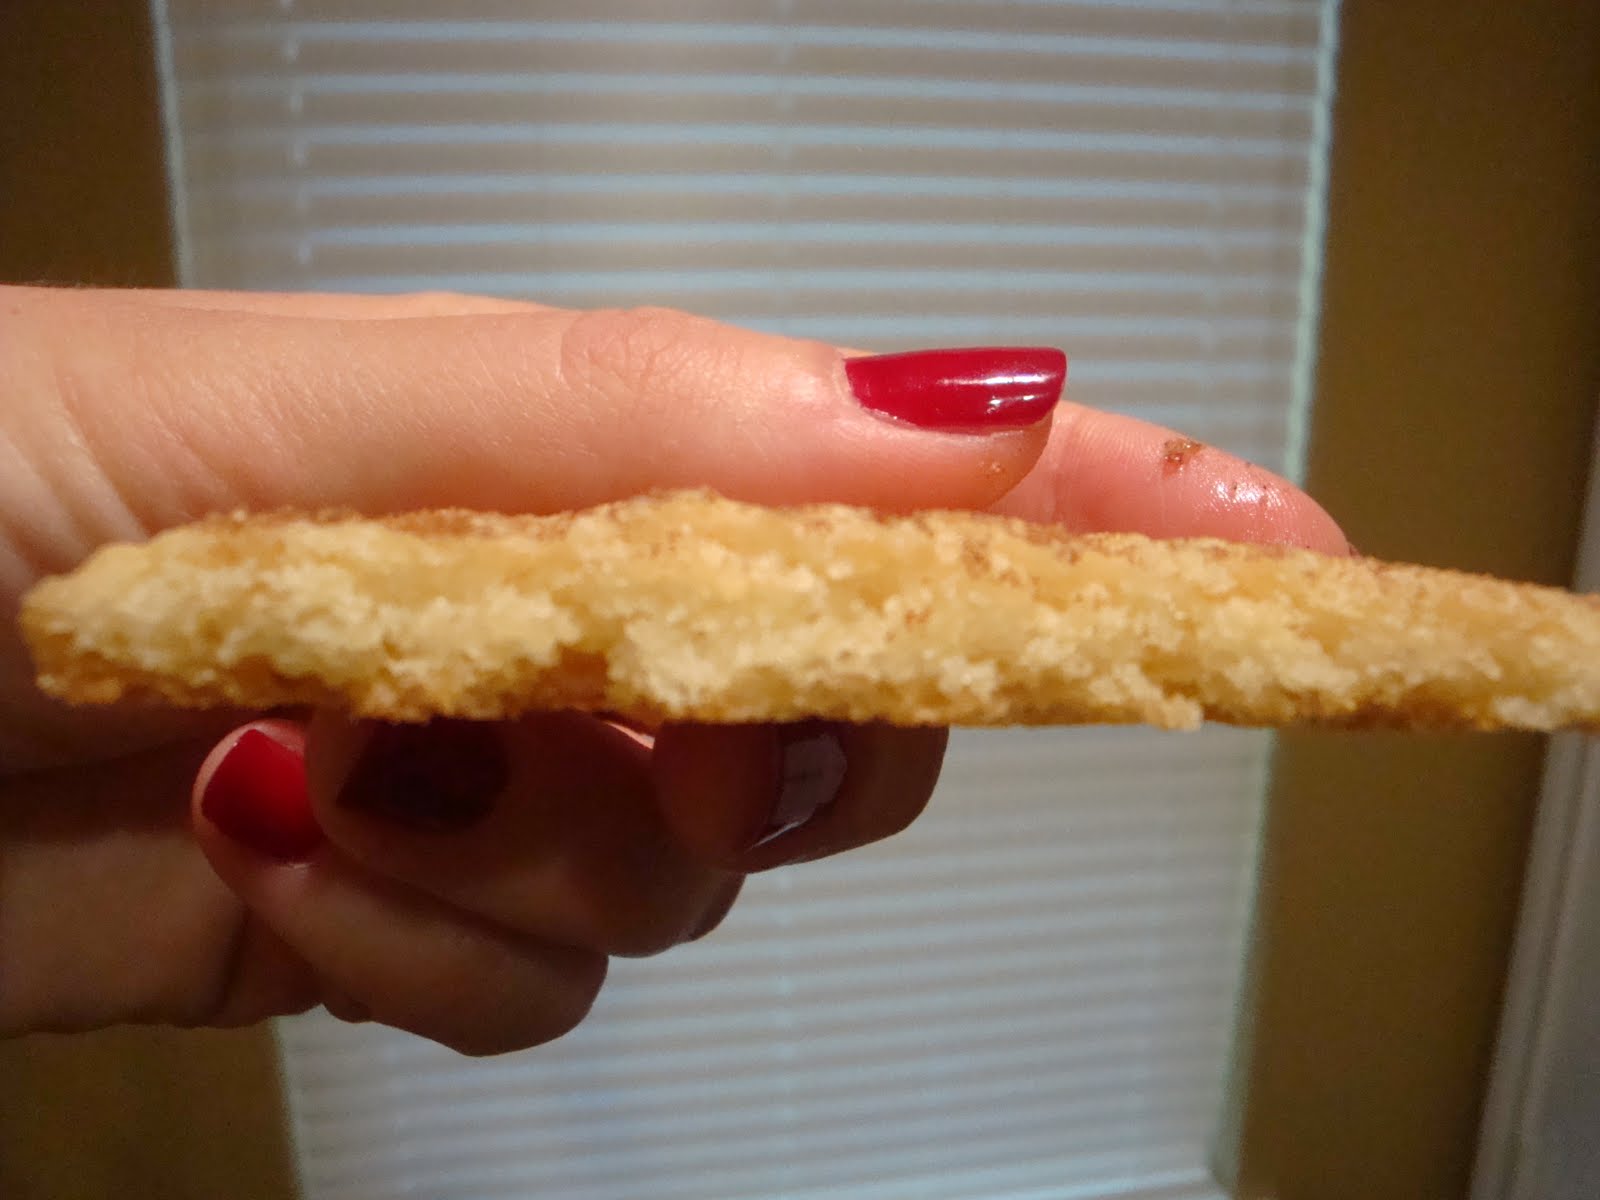
The cookies aren't completely glamorous looking, but I think the flavor of tagalongs is pretty darn close! If I make these cookies again I might increase the sugar a bit in the cookie dough to have a bit of a sweeter cookie like in the original Tagalongs. 
Inside view - Yum! 
Please forgive my lack of posts this past week and I have to tell you the posts might continue to wane a little bit this week. We are expecting "surface of the sun" like temperatures in Dallas in the next several days so I may not be able to stand being in the kitchen too much. You know the good ol' saying, if you can't stand the heat! Well, this gal loves cooking and baking but going from being hot outside to hot in the kitchen is a little too much sometimes. 

Wednesday, July 27, 2011

Baking for the Berry Family!
Snickerdoodles from Magnolia Bakery
On July 2nd the lives of the Berry family were forever changed due to a tragic car accident resulting in the immediate death of parents Joshua (41) and Robin (40) Berry. Their children, Peter (9), Aaron (8) and Willa (6) lives were spared from this accident but are suffering from multiple injuries sustained in the crash. Peter and Aaron suffered spinal injuries and are both, from my understanding, permanently paralyzed from the waist down. Willa suffers from several broken bones. The children’s physical injuries will, God willing, improve over time but the fact that these children lost their parents will be something that they grapple with for the rest of their lives.  

Several people in the community have said, it’s an awful thing to happen, especially as a parent, as if that gives them more credibility to be deeply saddened by this tragedy. The fact is, everyone who has heard about it is heartbroken by this story. How quickly something like this can happen and change a family forever is nothing short of devastating to think about for anyone. It makes you think about your own life and those who you value and how they can be taken from you in an instant.

I personally have never met any members of the Berry family and had never heard of this family prior to the car accident, but I have been forever changed since hearing about them. In your community you may have heard about various activities and fundraisers occurring for the benefit of being directly donated to Joshua and Robin Berry Children’s Trust. This past Sunday, here in Dallas there were two bake sales of which I was asked to bake some stuff. I chose to make Snickerdoodle cookies. They have been my favorite cookie since I was a child and they are a relatively easy recipe that’s full of flavor. I was glad I could help in some small way. 

More important than the process and baking of the cookies (which is included below) I would like to tell you about various ways in which you can help. There are multiple events continuing to happen online (online sales and promotions) and throughout the Country that you could perhaps participate in. You can find out more here, here or here. Alternatively, if you would like to donate directly to this cause by sending a check. I think it’s safe to say that no amount is too small. Please make the check payable to Joshua and Robin Berry Children’s Trust and mail to Bank of Texas, 510 Bering, 5th Floor, Houston, Texas 77057

Now for the cookies. These are from the once before visited The Complete Magnolia Bakery written by Alyssa Torrey and Jennifer Appel. The recipe for the Snickerdoodle cookies that I made can be found on page 56. It seems that Amazon still does not show this book to be in stock but it appears you can purchase it on Overstock at this link 

As I mentioned above, Snickerdoodles were and remain to be my favorite cookie variation since I was a child. It might have something to do with that perfect sugary-cinnamon crunch on the outside and biting into a soft almost decadent, buttery cookie. This recipe is no different than I remember from childhood but the technique is slightly different. You bring all ingredients down to room temperature (eggs, butter, milk) and after combing the ingredients to form a dough, you put the bowl of dough in the refrigerator to firm up for about 2-3 hours (or overnight as I did). They turned out just wonderful and I will definitely be making these cookies again. This is the first recipe I've tried in a while that I don't feel like I would want to change anything. The recipe is perfect, in my opinion, as it is!

Here are the relatively simple ingredients displayed for you to see.
A cooling rack full of cookies just waiting to be bagged up and donated to the bake sale for the Berry Family. 
An inside/side view of a cookie - you can almost see from the photo just how delicate and truly delightful in flavor these cookies were.
We had some friends in from out of town when I baked these cookies and they got to sample them as they were baking and told me they liked them. The ultimate compliment that I received was from one of my husbands friends who said that he doesn't ordinarily like Snickerdoodles and liked these! Bravo me, with the help of Magnolia Bakery's recipe of course!

Sunday, July 24, 2011

German Chocolate Cake with a twist 
This cake is, as Barney Stinson would say "Legen....wait for it....dary!!! It's Legendary!

The recipe comes from the first cookbook of Matt Lewis and Renato Poliafito, Baked: New Frontiers in Baking. Baked is the name of the authors Bakery in Brooklyn, New York. This is the same bakery that has been featured on Bobby Flay's Throwdown as well as Oprah's list of favorite things! This particular recipe that I used can be found on page number 83 & 84 of the book along with the Milk Chocolate Frosting Recipe on page 60 and 61. 
Let's talk about the cake. The occasion was David's Birthday Celebration this past Saturday night. His request for a Birthday cake was German Chocolate cake. I knew I had the greatest source for a recipe! I've made various recipes of German Chocolate Cake in my time and this has got to be the most interesting, but excellent, one of them all! The cake itself starts out with an extremely simple batter but the ingredients are kicked up a notch. Instead of using regular Hershey's Cocoa Powder, you use Valrhona or another deep rich cocoa powder (they use Valrhona at the Bakery). For the hot coffee, instead of using just any old strong cup of hot coffee, I made espresso in my beloved Nespresso machine. As I've told you many times in the past, the ingredients you use are a direct reflection of what your finished product will be and taste like. 

I have displayed the ingredients for the cake below. Nothing extremely out of the ordinary as you can see.
Here are the naked cakes chilling out getting down to room temperature. I have never worked with such a fragile cake that has both a dense crumb and is so incredibly moist at the same time. Truly a revelation!
As you can see the ingredients for the Coconut Pecan Filling. I decided to toast both the shredded coconut and pecans on the stovetop as opposed to in the oven which I think was a good idea and worked out very well! You just have to stir constantly to prevent burning instead of toasting. Also, there were three large egg yolks - one of them broke in my hand but made it in the little bowl.  
I always somehow fail to take a picture of a certain step, in this case I didn't take a picture of the rich, coconut, pecan filling that is the best coconut pecan filling I have ever tasted in my life. Some mistakes were made in the composition of the filling, but I don't think that anyone noticed. 

The cake as you can see is now constructed with the 3 beautiful layers of dark chocolate, rich, cake with a pecan filling. 
The next day, I made the milk chocolate frosting of which the ingredients are displayed below. 
I went with all Milk Chocolate, while the recipe does call for half milk chocolate and half bittersweet. I thought we had bittersweet chocolate in the house but did not. 16 oz of chocolate is a lot and while ideally I would have loved to have gone with a higher caliber of chocolate, I just couldn't justify spending roughly $30.00 on chocolate bars for the icing. 

Here is the finished iced product. Unfortunately, as per usual I did have some piping difficulty but it's all about flavor isn't it? I think that I am going to enroll in a cake decorating class at Cake Carousel here in Dallas so that my cakes look a little nicer. 
I got compliments from all of the guests at David's birthday dinner, some of whom said they don't like chocolate cake and/or don't like coconut. I was glad that everyone seemed to enjoy the cake, mostly important the Birthday Boy loved it! 

Unfortunately it didn't slice very cleanly, but I think it might have to do with the sub par knife that the restaurant provided me with to cut the cake. Below is a photo of a slice of cake.
Last but not least, here is a picture of me and my husband at the Birthday celebration! So much fun!

Tuesday, July 19, 2011

"It's now or never" that's what Elvis said.
Passionate Presley is what I'm calling this creation! 

Peanut Butter and Banana - it was supposedly Elvis' favorite sandwich! I've created the sandwich in cupcake form kicked up a notch to include miniature chocolate chips. So what exactly are these cupcakes comprised of? My very own mad scientist creation which is a super moist Banana Cupcake studded with Miniature Chocolate Chips, Topped with Peanut Butter Butter Cream and finally garnished with a Slice of Fresh Banana. 

I will not divulge the recipe, nor will I show you the ingredients but I assure you the recipe is written down in the confines of Chez Granit. This is going to be added to my arsenal of recipes that I plan to develop to maybe, one day in the future, sell or start a business with. No, it won't only be cupcakes, but the first recipe is indeed a cupcake. I love bananas and I love peanut butter - who doesn't? 
 
Here is a picture of the freshly baked and cooled naked cupcake.
Here is a picture of the cupcake in it's finished, iced form. I named this cupcake the "Passionate Presley" because if you know anything about Elvis, he was passionate about EVERYTHING and just simply calling a cupcake "The Elvis" sounded slightly silly to me. 
My precious husband who puts up with and most importantly fully supports my baking efforts thought they were extraordinary! I myself, think they're good but could be improved upon slightly. What's funny is that as I'm writing this I am currently watching Hell's Kitchen. As everyone knows Gordon Ramsay has incredibly high standards when it comes to food. I think that I might top him in the standards that I have for myself in the kitchen, especially when it comes to baking. I will accept nothing short of perfection! 

Here's another view of the iced cupcakes. I'd love to hear what you guys think and some other unusual sweet food items you would like to see in cupcake, cake or cookie form. 
Next up this week: Baking for the Berry's - stay tuned! 

Sunday, July 17, 2011

Velma's 50th Birthday! 
Chocolate Sheet Cake   

The base of this recipe is not my own. It actually comes from the Pioneer Woman Cookbook entitled The Pioneer Woman Cooks, Recipes from an Accidental Country Girl.  

I purchased the book from Borders when the Pioneer Woman (Ree Drummond) was going to be in Dallas for a book signing. Here's how it went down. I purchased the book the weekend prior to the signing which was on a Monday. My Mom picked up the wrist band for me from Borders at 10:30 a.m. that Monday morning. I headed to Borders straight after work and there was NOT ONE SINGLE parking space to be found in that whole huge parking lot! I'd say I arrived in the lot at 5:25 p.m. and the signing wasn't scheduled to begin until 7:00 p.m! I mean to tell you I circled that dang parking lot for 20 minutes looking in every nook and cranny that parking lot had. I exited and re-entered and finally, feeling defeated, left after 20 minutes with no luck! People are mean about parking spaces though! It reminded me of that scene in the movie Fried Green Tomatoes - ahhh, I sometimes wish I was braver, or had more insurance! Anyhoo, The Pioneer Woman actually has a blog that I highly recommend you check out at this link.

For this recipe of Chocolate Sheet Cake I used every single ingredient and direction for combination of ingredients that the Pioneer Women writes in her recipe. I did, in true Shauna form, add my own touch so to speak to the recipe for the Birthday Girl of whom the cake was made. 

"It's Velma's 50th Birthday," so I was told on Monday of this past week! "Wait, What, When?" was my reply! I adore Velma and a Birthday as special as 50 deserves a special cake. She sooo doesn't look 50 by the way and no I'm not just saying that! I asked what her favorite type of cake was and while I didn't have the time on my hands to make her absolute favorite (German Chocolate Cake). I think she dug this one just the same! 

It starts out with incredibly simple ingredients that almost every single person has on hand and if they don't they ought to be ashamed of themselves! All ingredients for the cake itself are pictured below. I did not include the secret ingredients of the cake in the photograph. I want to see if you can figure it out I will post what the secret ingredients were at the very end of this post. Don't cheat and scroll ahead please and also thank you! 
I did not take a picture of the naked cake because you would have figured out the secret ingredient in the cake so let's move on to the Frosting.

Here are the ingredients for the frosting - ready to go! I forgot to push the bottle of vanilla into the picture as I was sort of in a hurry but it was in there as was a secret ingredient to be disclosed later on! 
And here we have it! The finished frosted cake with the '5' and '0' candles appropriately placed waiting for Velma to come in from an office down the hall for me to light the candles and for all of us to sing her HAPPY BIRTHDAY! I don't think I mentioned that she wasn't as surprised by this cake as I intended her to be. I'm horrible at keeping secrets, just awful and when I went to tell her Happy Birthday first thing in the morning on Friday I broke down and told her that I had made her a birthday cake.
Slicing this cake is really easy, but really fudgy, I cleaned off the knife a few times while slicing it so as not to load up too much on frosting! A pretty darn close to perfect slice of the cake sits before you now! Ahhh, I have to say it was pretty good. Moist and tender with some variances of texture. I have some things I might want to change next time, but that's the same with almost every recipe I try.
So you wanna know what the secret ingredients were? After pouring the cake into the pan, I sprinkled some semi-sweet chocolate chips. What quantity of measurement? I can't really tell you how much because I have no idea, it was literally 3 handfuls and I just eyeballed it. For the icing, since Velma is a fan of German Chocolate Cake I put some shredded coconut in the frosting. How much? Once again, I have no idea, I eyeballed it again and just took the little baggy of coconut and poured some in until I felt there was enough. I urge everyone who bakes to get creative like this! Mix some stuff in, add a surprising texture! Just be sure to tell people if you added something because we have to remember the folks with food allergies out there! 

Wednesday, July 13, 2011

Did you know that July is National Blueberry Month?
Blueberry-Lemon Bundt Cake and a rant about Organic foods.
When my husband and I were in Italy in May I ate McDonalds one day. I’m not proud of this fact, but I have to tell you, at a certain point you get sick of any genre of food. I had just about had enough Italian food on that particular afternoon and McDonalds seemed to be the only place in sight that screamed American Food! The point is, I ordered my typical Happy Meal, (I’m sure it was called something else there) consumed it and somehow didn’t get sick! I have always gotten sick when eating Happy Meals which is why I gave them up several months earlier (even though I still secretly loved them)! I found it crazy that I didn’t get sick in Italy! 
Incidentally, on the way home from Italy to Dallas we had a layover in Chicago. I hadn’t slept on the 10 hour flight home and what sounded good to me after eating Italian food for 10 straight days? You guessed it, the comforting Happy Meal! Guess what though?!? When I ate the Happy Meal in Chicago it made me sick, when days earlier the “same” Happy Meal in Italy did not make me sick. Coincidence? Food standard differences? Why the heck am I telling you a story about a Happy Meal that I ate in Italy? Let’s move on to my blog topic of today. I promise you there's a point!
When I work with a recipe, especially when a recipe involves produce of some kind, I always purchase organic. I actually try to purchase everything organic. Why? Unfortunately in America the USDA allows pesticides and all sorts of crazy and wacky chemicals to be sprayed on virtually every single solitary item that we purchase for consumption at the grocery store! Have you ever noticed at Tom Thumb (this is a Dallas grocery store for my outside of Texas readers) that the organic apples look a LOT less shiny than the regular less expensive apples? Do you think that’s because they’re dirty or any less delicious on the inside? Nope, it’s because the non-organic apples are sprayed with all sorts of crap to make them shiny! If you’re eating that apple, you are also willingly consuming chemicals that were sprayed on it to make it look so pretty at the grocery store. In other countries, such as Italy. The food standards for EVERYTHING are much higher meaning that they aren't allowed to spray all of that crap on the food that the consumer will then consume (don't even get me started on meat and anti-biotics) I feel that people in America should have higher standards for themselves! We are what we eat after all!
Enough of that, believe me when I tell you that is a subject that I am passionate about. As if you couldn't already tell!
Today, I am making Blueberry-Lemon Bundt cake for a friend in my office who has been helping me with inspiration for my blog as far as things that she'd like to see made. We had talked about the recent seasonal cupcake at Sprinkles that was Blueberry-Lemon. I said I didn’t want to make something like that so soon after I had just made the cupcakes for David. So I found this recipe instead on Martha Stewarts site – have I mentioned on this blog how I think she might be another species all together, as in not human? Not in a bad way though because I absolutely adore her! Perhaps that’s a topic for another day.
You can find the recipe for the Blueberry-Lemon Bundt Cake at the following link, the only change I made to the recipe is that I added the juice of one of the lemons to the batter. Additionally, I made the lemon glaze, the recipe can be found at this link 
Here are the ingredients displayed for you. As an FYI, the organic ingredients in this recipe are as follows: the butter, eggs, lemons and blueberries. While I wish that I could purchase ALL organic ingredients (even the flour and sugar), at this time I just can't afford it. Unfortunately organic foods are much costlier than non-organic.
And here it is! The cake - naked, without the glaze! Oh, but the glaze is coming! By the way, I didn't photograph the ingredients for the glaze (lemon juice and confectioners sugar) nor did I photograph the finished glaze waiting to be poured over the cake. I will tell you though that the glaze has a striking resemblance both in color and texture of elmer's glue, but the taste! Ahhh, the taste! 
Here is the finished product, yes, I put the thick, tangy, gooey, delicious glaze on the cake while it was still warm and let the warmness of the cake help the glaze drip down the sides. Yum-O!
Did you honestly think that I could resist trying this cake? Are you serious? I mean, I do bake for others mostly, but I have to at least taste it! I have to say, this one is a winner! 
One more thing to all of my readers!!! I just want to tell you that I love you, I mean that, I LOVE YOU!!! You read my stuff and stick in there with me. Drop me a line if you feel so inclined and tell me about yourself! I'd love to learn more about YOU!

Sunday, July 10, 2011

Chocolate Cupcakes with Vanilla Buttercream Icing
& The Cupcake Trend!

Every person who bakes, even from mixes, has jumped on the cupcake bandwagon. I was reading a couple of days ago about what the next dessert trend is going to be to take the reigns from cupcakes. Snickerdoodle cookies some food bloggers say while the more common consensus is Pies! Soon on this blog I will visit pies and my battle with not the making, but rolling out pie dough! It's tricky, that's all I'm going to say about it at this point. 

My go to cupcake recipe comes from the Complete Magnolia Bakery cookbook. Unfortunately the book does not appear to be sold directly by Amazon currently, but there are some re-sellers on the site or you could always check out one of the local book stores in your area. I've personally had the cookbook for a couple of years and purchased it at Barnes & Noble.  Here's a picture of the well loved book and the little chomp that Atticus took out of the top right corner of it when he was a puppy. 
This particular bakery, if you recall, first became famous when Sex and the City was airing on HBO. It actually, surprisingly enough, became part of a Manhattan "Sex and the City themed tour" as crazy as that sounds. Several years ago, while I didn't go on the tour (I personally thought it was stupid), I did go and visit Magnolia Bakery to find out what all of the fuss was about. I was not disappointed. While I wouldn't say they are the GREATEST cupcakes I've ever had they are moist and not terribly sweet, but the icing compensates for the lack of sweetness in the cupcake itself. 

Why is it that short work weeks always seem longer? Is it because we have to stuff 5 days of work into 4 days or is it just one of those natural rules of the universe? Regardless, David and I both had a tough work week and were exhausted. While David was sitting on the couch yesterday afternoon I decided I would make him cupcakes as a treat! I made sure I had all of the ingredients on hand and halved the recipe, from 24 to 12, for the Chocolate Cupcakes (pg. 108) and Vanilla Buttercream frosting (pg. 127) and was on my way! 

Below the ingredients for the cupcakes themselves are displayed. The unsweetened chocolate was melted and cooled before being combined into the batter. As a general rule in baking I like to use more high quality chocolate, but I am all about using what one has on hand which is what I did for this recipe. Buttermilk is called for in the recipe and gives the cake a nice subtle tang but I'd imagine if you didn't have any buttermilk you could substitute regular milk or even soy milk for the lactose intolerant! 
Many cupcake recipes tell you that you can use a stand mixer for the procedure of combining the ingredients, which is fine, but I personally use an old fashioned whisk once the flour mixture comes into play. As I've said before I will say again, do not over beat batter which adds too much gluten! Too much gluten in cake or a cake type product is BAD. If you want a cupcake that would break your teeth, go ahead and over beat the batter (obviously I'm kidding here). I'm sure you've had an over beaten cake product before and it's not pleasing to the palate. It's just yuck! Hard to explain, almost tough, but yuck!

The ingredients for the vanilla buttercream are quite simple. The recipe calls for plain milk, I only had skim milk, buttermilk and heavy cream in the house. The cake already has buttermilk in it and skim milk is just crazy talk when making a decadent baked good. I went with heavy cream and the result was delicious! 
The prepared cupcakes are pretty special looking just waiting for the frosting to be piped on after they've cooled of course. I'm still working on my piping techniques as I've had no training whatsoever so you're just going to have to bear with me on the fact that my piping doesn't look so great and professional. 

Naked Cupcakes
A singular surprise for my husband. I won't lie - I sped up the process of the cooling process for a few of them by placing them in the refrigerator like they do on cupcake wars! 
Davids comments included "Wow" and "you could sell these" etc. While those compliments are appreciated from my loving and amazing husband, this is not a business. I certainly do have aspirations of one day owning a bakery however at the current time, my baked goods are for the enjoyment of my family, friends and co-workers only. Now if you know someone who wants to do a business venture of a not so typical bakery in Dallas, please ask them to contact me! 

Thursday, July 7, 2011

Ellen Pallooza Dessert - Part Three!
The World's Best Birthday Cake

I've made this cake before, for my Sisters birthday (in May) more specifically and tried with all of my might to get my Mom to choose any other Birthday Cake. She persisted that she wanted the Birthday Cake I made for my Sister and I certainly can't say I blame her.

The cake itself is delicate and beyond moist! A true dream as far as vanilla cakes go. As you know and I'm sure have tried plenty, vanilla cakes can be VERY boring and almost flavorless. This cake is far from boring and once you add the icing...HEAVENLY! Yes, I'm using the word heavenly here! Take a moment and let that sink in. 

Who created this masterpiece of a recipe that I simply follow to the letter like I'm reading the ingredients and recipe of Aurora's Chicken Pepperoni that I'm going to serve the Governor? (Major Props if you get that random movie reference) None other than Joanne Chang of Flour Bakery in Boston. Remember her name? We last talked about her when I made her Banana Bread. Her recipes will be visited quite frequently on my blog so I highly suggest, as I have done before, purchasing her book on Amazon or wherever you can find it. I will never share a recipe of hers or any other cookbook author here unless they grant me explicit authorization to do so. Most cookbook authors whose books I bake out of, I have communicated with in some form or another. I don't intend to and never have asked because of my level of respect for their art of developing recipes.  

This recipe can be found in the Flour Cookbook on pages 164 through 167 - there is a picture on one of those pages but the rest is instructions. It is an intermediate recipe. I certainly wouldn't say it's extremely complicated. It is just time consuming and if you are going to make it I suggest reading and re-reading the recipe several times before beginning so that you are prepared. 

Below you will see the ingredients displayed for your viewing pleasure. It does have more ingredients than most standard vanilla cakes but they are all special in their own way! I highly suggest you go with high quality ingredients from the eggs, butter, vanilla, etc. The higher quality the ingredients you use to bake with, the higher quality product you produce. For my twitter friends #FACT! 
You are going to be combining these ingredients slowly and skillfully to produce this amazing cake. I forgot to take photos of the cake just out of the oven so you'll just have to trust me on this one. Once you get to the frosting you'll know why I was a bit pre-occupied when the cakes were coming out of the oven. 

Below you will find the ingredients of the frosting displayed. 
The frosting is referred to as a Fluffy Chocolate Ganache Frosting because you begin by making a simple ganache (chopped chocolate and heavy cream) and allowing it to cool to room temperature. After it has cooled you combine it with the other ingredients and whip it with your stand mixer until it turns into something you've never tasted before. A delightful combination of bitterness (if using bittersweet chocolate like Joanne recommends) and sweet that are a revelation when paired with the delicate bite of the vanilla cake. 

Let's take a moment to gaze at the beauty that is shiny, velvety delicious ganache.
The ganache lightens a great deal in color when combined with the other ingredients of the frosting. 

I have done my best to show you that you need to buy the cookbook and then immediately make this cake. Don't believe me? Let's take a look at the finished product.


Needless to say, my Mom was thrilled with her Birthday Cake and I received compliments from almost all of her guests! 

Please stay tuned for the next installment of Shauna Bakes coming your way soon! 

Wednesday, July 6, 2011

Ellen-Pallooza Dessert - Part Two

Cream Cheese Pound Cake for my Mom's Birthday.


When talking about the 4th of July we wanted to have a lighter dessert option to offer that didn't involve chocolate. My Mom wanted to buy fresh fruit and we thought that a Pound Cake and whipped cream would go great with it. Sara Lee was mentioned at which point I was like "what the heck? You've got Shauna Granit!" Now mind you, this pound cake is rather dense but remained moist! A difficult combination to achieve, but I think I nailed it! Paired with Fruit and whipped cream I found it to be a real winner for dessert for those who want to feel like they're being good (because this pound cake is anything but good for you!)

I adapted the following recipe from All Recipes and of course any variation of pound cake is always great in my opinion because they are so easy and really a great dessert for any time of year! One thing that I want to continue to pound into the heads of my readers is something that has been pounded into my head. Do not, for the love of God over mix the batter! I promise, when over mixed it will be dense, but not in a good way, and have the bite of a bread instead of a delicate bite. Delicate bites are what you are after when baking!


Here are the from scratch ingredients displayed before you. As you can see, this is a pretty easy recipe comprised of only 6 ingredients!
Cream Cheese Pound Cake 
Ingredients:
1 (8 ounce) package of cream cheese - room temp.
1 1/2 cups unsalted butter - room temp.
3 cups white sugar
6 eggs - room temp.
3 cups AP Flour
1 teaspoon vanilla extract


Preheat oven to 325 and prepare a 9.75 inch bundt pan or 10 inch tube pan. 

In the bowl of a stand mixer using the paddle attachment cream butter and cream cheese until smooth. Add sugar gradually and beat until fluffy. You may have to stop the mixer a time or two and scrape down the sides of the bowl with a spatula.

Add the eggs two at a time mixing until integrated, scraping down the sides of the bowl as needed. Add the flour all at once with the vanilla and mix until just combined. Do NOT over mix. It is always best at this point to use your rubber spatula and gently mix by hand if there are any streaks of flour remaining. This is also the opportunity to integrate any flour that may have somehow made it's way to the bottom of the bowl. 

Pour the mixture (slowly) into a well prepared bundt or tube pan, when I say well prepared I mean butter and flour that baby like there's no tomorrow. The saddest thing that can happen to a bundt and/or tube cake is it not releasing from it's mold. 

Before placing the cake in the oven gently lift the pan a couple of inches off of the counter and then drop back onto the counter a few times to get any air bubbles out that may be in the batter. 

Now to borrow a phrase my great-grandmother used to use, "you're just going to want to bake it until it's done dah-ling!" This may or may not equate to an hour to an hour and 20 minutes or until a toothpick inserted into the cake comes out clean. 

Allow the cake to cool in the pan for about 30 minutes before inverting it onto a cooling rack to allow to cool completely.

Dust with powdered sugar prior to serving with various fruit and whipped cream! Voila! Yummy!


Monday, July 4, 2011

Ellen-Pallooza Dessert - Part One 
Cake Balls for my Mom's Birthday
which also happens to be the Fourth of July!

My Mom specifically asked me for Cake Balls for her Birthday. By now, since you've gotten to know me and my from scratch ways, the search began for a from scratch recipe for the cake itself as well as the frosting which are typically comprised of cake mix and canned frosting for most "recipes". Not for me though, nope, this is a from scratch kind of place!

I found the recipe in Bakerella's (Angie Dudleys) Cake Pops Book. You can order the book at this link - the recipes for the cake and frosting can be found on pages 148 and 149 of the book respectively.

Cake ingredients lined up in a pretty little row to bake a perfect 9x13 yellow cake for Cake Balls. 
Baked Cake - Prior to crumbling it up I wanted to try it to make sure it was good, what it came out as was quite refreshing and not at all like the artificial flavor found in cake mixes. It was a pretty plain jane cake and not overly sweet. 
Frosting ingredients are lined up in a pretty little row to make a perfect basic vanilla buttercream frosting for Cake Balls. Bakerella will tell you that you can add a little bit of milk to the frosting if it's too thick. Thank goodness I have a KitchenAid Mixer because while it was thick, the KitchenAid did most of the work for me so I didn't have to add milk.  
After an hour of cooling in the refrigerator, the two (Cake and Frosting) shall meet in a glorious large stainless steel bowl where they will be mixed together to form one large blob of cake and frosting deliciousness to be formed into what else, balls!!!

I personally have some secrets regarding making cake pops/balls perfect and I hope you didn't come here thinking that I was going to give them all away, no can doosville baby doll!

As you can see from the ingredients shown, it really is quite simple to make stuff like this from scratch, just a little bit more time involved, but believe me when I tell you it is worth it!

And here they are! The loveliness of Cake Balls all decorated for my Mommy's Birthday! Who else gets fireworks for their birthday?
Stay tuned for two more forthcoming blogs of the other desserts for my Mom's Birthday!